Hear the Birds Sing

วันอังคารที่ 5 กันยายน พ.ศ. 2560

เย็บถุงหูรูดไว้ใส่มะคำดีควายซักผ้า -- Sewing a Drawstring Soap Nut Wash Bag

20:52 0
เย็บถุงหูรูดไว้ใส่มะคำดีควายซักผ้า -- Sewing a Drawstring Soap Nut Wash Bag
สองสามปีก่อน เพื่อนชาวญี่ปุ่นของฉันมาถามหา "soap nut" ว่าหาซื้อได้ที่ไหนในเมืองไทย
เธอบอกว่าอยากเอาไปใช้ซักผ้าแทนผงซักฟอก
ตอนนั้น ฉันยังไม่รู้จักว่า soap nut คืออะไร พอลองเสิร์ชหาดูถึงได้รู้ว่าคือมะคำดีควาย
สมุนไพรไทยของใกล้ตัวที่เอาไปใช้ทำผลิตภัณฑ์บำรุงเส้นผมและเป็นยาแผนโบราณนี้ นอกจากจะใช้ประโยชน์ได้หลากหลาย ยังเป็นที่นิยมใช้กันในหมู่คนรักษ์สิ่งแวดล้อมไม่น้อย
อยู่เมืองไทย หามะคำดีควายได้ไม่ยาก ใช้แล้วไม่ต้องกังวลว่าสารเคมีจากผงซักฟอกจะตกค้าง ไปทำร้ายดินหรือน้ำ ใช้แล้วไม่มีขยะไปกองเพิ่มในบ่อขยะเพราะย่อยสลายได้ทั้งหมด
วิธีใช้มะคำดีควายกับเครื่องซักผ้าก็ง่ายมาก เพียงใส่มะคำดีควาย 4-6 ผลลงในถุงผ้าหูรูด แล้วใส่ลงในเครื่องซักผ้าพร้อมผ้าที่จะซักเลย ซักได้ประมาณ 5 ครั้ง

พอฉันลองใช้ดู โดยใส่มะคำดีควายทั้งผลลงไปแต่ไม่ได้ใส่ถุงผ้าก่อน พอซักออกมาพบว่ามีคราบสีออกน้ำตาล ๆ ติดเสื้อผ้าหลายครั้ง
หลังจากผัดผ่อนมานาน สุดท้ายก็หาเวลาทำถุงผ้าหูรูดจนได้
และนี่คือวิธีทำค่ะ

A few years ago, my Japanese friend asked where could she get soap nuts in Thailand.
She wanted to use it as an alternative for her laundry detergent.
At the time I didn't know its English name, so when I looked up the word, I found that it's an ingredient widely used in hair care products and traditional Thai medicine.
In the past, people used it to wash cloth, dish, jewelry, hair and body before the invasion of commercial detergents took place.
Since it's not hard to find, it's biodegradable, and I don't have to pollute the water or the soil with chemicals, the idea of using soap nut in my laundry sounds great.
I found an easy way to use soap nut in your laundry from WellnessMama, by putting 4-6 nuts in a muslin bag and into your washing machine. It is good for up to 5 loads.

I didn't put mine in a muslin bag and ended up having brownish stains on my clothes.
After dragging my feet for a long time, I finally made time to make a drawstring bag from muslin cloth and here is how.


เจ้าโฮ่ง ๆ ก็มาช่วยด้วย
My dog decided to join me with the sewing.

วิธีทำ -- Instructions

1. ตัดผ้าดิบให้ได้ขนาด 35 x 12 ซม.
1. Cut a piece of 35 x 12 cm fabric.

2. เย็บเก็บริมผ้าด้านยาวทั้งสองฝั่ง
2. Hem both long sides of the fabric.


3. พับขอบผ้าฝั่งที่กว้าง 12 ซม. ลงมาอีก 2.5 ซม. แล้วเย็บเก็บริมผ้า ทำทั้งสองฝั่ง
3. Fold the 12-cm edges down 2.5 cm on both sides and sew the hems.


4. พับผ้าด้านยาวลงมาครึ่งหนึ่ง เย็บผ้าให้ติดกัน โดยหันผ้าด้านถูกเข้าหากันแล้วเย็บไปตามริมผ้าฝั่งยาว เว้นช่องสำหรับร้อยเชือกไว้ เมื่อเย็บริมทั้งสองฝั่งแล้ว กลับผ้าด้านในออก
4. Fold the long side of fabric in half and sew along the hems with right sides facing each other, leaving the drawstring channels. After sewing both sides, turn it inside out.


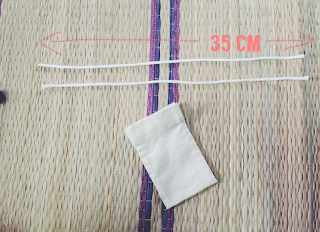
5. ตัดเชือกยาวเส้นละ 35 ซม. สองเส้น
5. Cut two pieces of 35 cm cord.


6. ร้อยเชือกเข้าทางรูที่เว้นไว้ แล้วร้อยออกรูอีกฝั่งหนึ่ง ใช้ปลอกปากการ้อยก็ได้
6. Insert the cord through one drawstring channel and out the other channel. I did mine with a pen cap.


7. มัดปมเชือก
7. Make a knot.


8. ทำซ้ำ คราวนี้เริ่มร้อยเชือกจากรูอีกฝั่งหนึ่ง
8. Repeat the process, starting from a different channel you did the first time.


9. วัดจากขอบลงมา 1 ซม. แล้วตีเส้นตามขวาง เย็บตามเส้นที่ตีไว้เพื่อล็อกเชือกไม่ให้เคลื่อน ทำทั้งสองฝั่ง
9. Draw a line crosswise 1 cm from the top edge and sew to keep the cord in place. Repeat on the other side.


เสร็จเรียบร้อย
Complete!


หลังจากเอามะคำดีควายใส่ถุงซักแล้ว ผ้าไม่มีคราบอีกเลยค่ะ
ขอให้มะคำดีควายช่วยซักผ้าให้สะอาดสดชื่น และฟอกใจให้สดใสด้วยค่ะ

The result? No more stain!
Hope these clean and fresh nuts help purifying your clothing and your mind.

วันอาทิตย์ที่ 3 กันยายน พ.ศ. 2560

กาเนติ -- Neti Pot

01:00 0
กาเนติ -- Neti Pot
ใครที่มีอาการภูมิแพ้หรือไซนัสอักเสบต่างรู้ดีว่าการที่จมูกตัน มีน้ำมูกไหลตลอดเวลานั้นน่ารำคาญแค่ไหน
ฉันเองก็แพ้อากาศมาตั้งแต่ยังเด็ก
จำได้ว่าตอนที่ยังเล็ก ทุกเช้าจะต้องทานยาแก้ภูมิแพ้ 1 เม็ดก่อนไปโรงเรียน
ตอนนั้นคิดว่าเราคงต้องพึ่งยาแบบนี้ไปเรื่อย ๆ ตลอดชีวิตแน่เลย
จนกระทั่งมาได้ยินเรื่องการล้างจมูกแล้วก็อยากลอง
การล้างจมูกครั้งแรกของฉัน ทำโดยใช้ไซริงก์กับน้ำเกลือที่ซื้อมาเป็นขวดจากร้านขายยา พอทำแล้วก็โล่งจมูกดี
เคยได้ยินเรื่องการล้างจมูกด้วยกาล้างจมูกที่มีชื่อว่า "กาเนติ" แต่ดูจะหาซื้อยาก ฉันเลยยังใช้ไซริงก์ต่อเนื่องเรื่อยมา ด้วยความที่มันทำจากพลาสติก เลยไม่รู้ว่าทำความสะอาดอย่างไรให้ปลอดเชื้อ ครั้นจะเอาไปลวกก็กลัวพลาสติกจะละลายออกมาปนเปื้อน พอใช้ไปสักพัก เริ่มสกปรกก็โยนทิ้ง ซื้อหลอดใหม่ ใช้แล้วทิ้งวนเวียนกันไปแบบนั้นมาหลายปี
จนกระทั่งย้ายมาอยู่เชียงดาว ฉันเริ่มคิดถึงทางเลือกอื่น ๆ ที่จะช่วยลดขยะจากพลาสติก
จะได้ไม่ต้องซื้อหลอดใหม่ ใช้แล้วทิ้งซ้ำ ๆ อยู่แบบนั้น
ฉันเจอกาเนติที่ทำจากเซรามิกขายทางออนไลน์
พอได้ลองใช้ดู นอกจากจะหายใจได้เต็มปอดสุด ๆ แล้ว
กาแบบนี้ยังเอาไปต้มหรือนึ่งฆ่าเชื้อ แล้วเอากลับมาใช้ได้ซ้ำแล้วซ้ำอีกไม่รู้จบ
เปรียบเทียบการล้างจมูกด้วยไซริงก์กับกาเนติ วิธีหลังนุ่มนวลและสบายกว่ามาก

Anyone living with allergies or sinus infection knows how annoying it is to walk around with runny and stuffy nose all the time.
I've been living with allergy for more than two decades.
As a kid, I used to rely on antihistamines, taking one pill every morning before going to school.
At the time I thought it was the only way to help me get through each day for the rest of my life,
until I came across the idea of nasal irrigation and wanted to give it a try.
I first went with a syringe and store-bought saline solution and was happy with the result.
Since Neti Pot seemed harder to find, I continued using syringe for years.
When I moved to the countryside and started thinking of living a more sustainable lifestyle, including a more sustainable way to clean my nose without having to keep buying new plastic syringes and throwing them away.
Luckily, I found my ceramic Neti Pot online.
What I love about this ceramic pot is that it is easy to clean and I can use it over and over without having to buy a new one.
It is also a much gentler way to help clear out my breathing passage. The first time I gave it a try was probably my first time in a long time to be able to breathe so deeply.


จากที่เคยต้องซื้อน้ำเกลือ เป็นขวด ๆ มาใช้ ฉันพบว่าเราทำน้ำเกลือได้เองง่าย ๆ ที่บ้าน
ขอบคุณสูตรจากหนังสือ "รักษาอาการเจ็บป่วยโดยไม่ใช้ยา" เขียนโดยคุณนิดดา หงษ์วิวัฒน์ สำนักพิมพ์แสงแดด

I was happy to learn that I could make saline solution at home through this book called "Treat Your Symptoms Without Medication" by Nidda Hongwiwat from Sangdad Publishing.


น้ำเกลือ
  • น้ำสะอาดที่ผ่านการกลั่นหรือกรอง อุ่น ๆ 1 ถ้วย *อย่าใช้น้ำประปานะคะ เพราะอาจปนเปื้อนหรือมีคลอรีนในน้ำ* ถ้าจะใช้น้ำประปาให้เอาไปต้มหลาย ๆ นาทีก่อนใช้
  • เกลือสมุทร 1/4 ช้อนชา
  • น้ำมะนาว 3-4 หยด

Saline Solution
  • 1 cup of distilled/filtered lukewarm water *Please do not use tap water as it may contain pathogens or Chlorine* If you are using tap water, boil it for several minutes before use.
  • 1/4 teaspoon of Sea Salt
  • 3-4 drops of lime

เราทำน้ำเกลือได้โดยใส่เกลือ 1/4 ช้อนชาผสมกับน้ำอุ่น 1 กาเนติ จากนั้นก็บีบมะนาวตามลงไป 3-4 หยด การบีบมะนาวตามลงไปจะช่วยให้น้ำมีภาวะเป็นด่างยิ่งขึ้น พอเกลือละลายก็เริ่มล้างจมูกได้
เริ่มจากสอดพวยกาเข้าไปที่รูจมูกข้างหนึ่ง ขยับตัวให้อยู่ในท่าที่สบาย กลั้นหายใจ แล้วเทน้ำเกลือให้ไหลออกมาที่รูจมูกอีกข้างหนึ่ง ทำซ้ำทั้งสองข้าง
ถ้าทำแล้วรู้สึกแสบ อาจเป็นไปได้ว่าน้ำเกลืออุ่นเกินไปหรือเค็มเกินไป ให้ปรับอุณหภูมิของน้ำหรือลดปริมาณเกลือลง จนกระทั่งรู้สึกสบาย

ส่วนมะนาวที่เหลือ ฉันบีบลงในน้ำอุ่นแล้วจิบ ทำให้รู้สึกสดชื่น รับเช้าวันใหม่ได้สบาย

To make Saline Solution, start by simply add 1/4 teaspoon of sea salt to a Neti Pot of lukewarm water and add 3-4 drops of lime (or lemon) to it. Adding lime to the solution makes it more alkaline. After the salt is dissolved, you can then put the spout of the Neti Pot in one nostril, adjust the position so that you feel comfortable, hold your breath, and pour the solution out the other nostril. Repeat the same process on the other side.
If you have a burning sensation inside your nostril, it can be because the solution is too warm or too salty. You may adjust the temperature or the amount of salt until you feel comfortable.

What to do with the rest of the lime? I squeeze mine in a cup of lukewarm water and sip it. It is an energizing way to kick start my morning.


การล้างจมูกสามารถทำได้ทุกวัน แต่ถ้าระบบทางเดินหายใจของเราอุดตันหนัก อาจต้องล้างหลาย ๆ กาหน่อยถึงจะรู้สึกโล่ง

ถ้าเกิดไม่มีกาเนติที่บ้านและยังไม่อยากซื้อ สามารถใช้กาอะไรก็ได้ที่มีพวยกาเล็กพอที่จะสอดเข้ารูจมูกได้ หรือลองใช้ไซริงก์ดูก่อนว่าใช้แล้วสบายไหม
อย่าลืมทำความสะอาดกาเป็นประจำ หลังใช้งานแต่ละครั้ง ให้ล้างด้วยน้ำยาล้างจานหรือสบู่ จากนั้นเทน้ำร้อนเข้าไปในกาแล้วเทออกซ้ำหลาย ๆ ครั้ง และนาน ๆ ทีอาจนำกาเซรามิกไปต้มหรือนึ่งเพื่อให้ปลอดภัยจากเชื้อโรค

You can rinse your nose daily. If your respiratory tract is heavily congested, you may need to use a few pots of saline of help clearing it out.

If you don't have a Neti Pot around or don't want to buy one, you can use any pot with a spout small enough to fit in your nostril or start with a syringe to see if you like it.
Don't forget to clean your pot on a regular basis. I clean mine with soapy water and pour boiling water in and out of the pot several times after each use. I boil my pot once in a while to make sure it is safe from germs.

ระบบทางเดินหายใจมีปอดเป็นอวัยวะสำคัญ ทางการแพทย์แผนจีนมองว่า ปอดเป็นทางผ่านเข้าออกระหว่างโลกภายในกับโลกภายนอกของเรา คือรับเอาอากาศดีจากภายนอกเข้ามาในตัวพร้อมปล่อยอากาศเสียออก และยังเป็นจุดที่คนเราสะสมความโศกเศร้าเอาไว้อีกด้วย
โรคที่เกี่ยวข้องกับปอดจึงอาจเกี่ยวโยงกับการที่เราไม่รู้จักขีดเส้นแบ่งให้ชัดเจนระหว่างตัวเรากับโลกภายนอก ไม่ชัดเจนว่าเรื่องไหนที่เรารับได้หรือรับไม่ได้ และสะสมความเศร้าเอาไว้มากเกิน
การฝึกฝนการรักษาสิทธิ์ของตัวเองและการปล่อยวางความโศกเศร้าก็ช่วยปอดได้อย่างน่ามหัศจรรย์ค่ะ

นอกจากนี้ ฉันยังพบว่าการฝึกโยคะวันละ 30 นาที ช่วยให้จมูกโล่งและสมองปลอดโปร่งได้ดีนัก และฝึกรับประทานอาหารที่ผ่านการแปรรูปน้อย เน้นการรับประทานพืชผักจากธรรมชาติ จะช่วยให้ร่างกายเรามีภาวะด่างอ่อน ๆ ซึ่งช่วยเสริมสร้างภูมิคุ้มกันโรคได้ดี

There is still more to it when it comes to the well-being of your respiratory system. In Chinese Medicine, lung is the gateway between yourself and the world and it is the part of the body where you store your grief.
Working with the inner aspects of setting your boundary and releasing pain and grief can do wonders.

I also find that a 30-minute of Yoga practice a day helps cleaning my nose and clearing my head. Eating less processed food and more REAL food is a great way to help making your body more alkaline and it can boost your immune system.

ขอให้มีสุขภาพที่แข็งแรงนะคะ เพราะด้วยร่างกายที่แข็งแรงนี้ เราสามารถทำอะไรเพื่อโลกใบนี้ได้อีกเยอะ
ขอให้สุขภาพดีและมีสุขค่ะ

Wishing you the best of health, because with the best physical body, we can do so much more to the world.
Stay healthy, stay happy!

วันพุธที่ 30 สิงหาคม พ.ศ. 2560

แป้งทอดไส้เผือกกวน -- Sweet Taro Hotteok

12:31 0
แป้งทอดไส้เผือกกวน -- Sweet Taro Hotteok
ฉันมีโอกาสได้กินโฮต็อกครั้งแรกตอนอยู่ที่ญี่ปุ่น
อากาศหนาว ๆ ได้กินของอุ่น ๆ หวาน ๆ ได้กลิ่นอบเชยที่สอดไส้อยู่ข้างในแป้งแล้วยิ่งอุ่นเข้าไปใหญ่ แถมเคี้ยวไปเจอถั่วแล้วกรุบ ๆ อร่อยจนหายหนาวเลย
ฉันลองหาสูตรทำโฮต็อก หรือแป้งทอดไส้อบเชยหวานนี้ จนไปเจอสูตรของ Maangchi  แล้วก็หลงรักสูตรนี้มาก
ได้ทำกินหลายครั้ง ทำกินเอง หรือทำไปให้ใคร ๆ ก็ชอบทั้งนั้น
นึกอยากลองทำไส้แบบไทย ๆ อย่างเผือกกวนดูบ้าง
ออกมาเป็นอย่างไรน่ะเหรอ ใคร ๆ ที่ได้กินพากันถามว่า "มีอีกมั้ย" ไงล่ะ

I had my first Hotteok in Japan.
It was a cold day in winter and when I bit into that sweet, warm treat with a hint of cinnamon and that crunch from nuts, I couldn't forget about it.
I tried searching for recipes and when I discovered Maangchi's Hotteok recipe, I went nuts.
I made it so many times, for myself, for my friends, for my family members.
I love this recipe of hers and I tried putting a twist on it with Thai filling, using taro, coconut, sugar and salt.
The result? Creamy and luscious treat that everyone asks for more.


วัตถุดิบทำไส้
  • เผือก 800 กรัม
  • กะทิ 400 มิลลิลิตร
  • น้ำตาลทราย 130 กรัม
  • เกลือ 1 ช้อนชา

Ingredients for the filling
  • 800 grams of taro
  • 400 milliliters of coconut cream
  • 130 grams of granulated sugar
  • 1 teaspoon of salt

วิธีทำ
Instructions

1. เริ่มจากเตรียมแป้งตามสูตรของ Maangchi 
[ ใส่น้ำอุ่นลงในชามผสม 1 ถ้วยตวง ตามด้วยน้ำตาลทราย 2 ช้อนโต๊ะ ยีสต์แห้งสำเร็จรูป 2 ช้อนชา เกลือ 1/2 ช้อนชา น้ำมันพืช 1 ช้อนโต๊ะ คนผสมให้เข้ากัน ใส่แป้งสาลีอเนกประสงค์ 2 ถ้วยตวงตามลงไป ใช้ทัพพีคดข้าวคนผสมจนเข้ากันเป็นเนื้อเดียว พักแป้งให้ขึ้นฟู หาฝาปิดหรือผ้าคลุมไว้ แล้วพักทิ้งไว้ที่อุณหภูมิห้องประมาณ 1 ชั่วโมง ระหว่างนั้นเตรียมไส้ได้ค่ะ จะใช้เวลาประมาณ 1 ชั่วโมงพอดี พอแป้งขึ้นฟูเป็นสองเท่า ให้นวดหรือใช้ทัพพีคนเพื่อไล่อากาศในแป้งออก แล้วพักแป้งไว้อีก 10-20 นาที พอจะใส่ไส้ให้นวดอีกครั้ง โรยแป้งนวลเพื่อกันติดมือ แบ่งแป้งออกเป็น 8 ส่วนแล้วคลึงให้เป็นลูกกลม ]
1. Start by preparing the dough using Maangchi's Hotteok recipe.

2. ระหว่างที่รอให้แป้งขึ้น ล้างเผือกให้สะอาด ขัดเอาขี้ดินออกให้หมด
ขั้นตอนนี้จะปอกเปลือกเผือกแล้วหั่นก่อนจะนำไปนึ่งก็ได้ แต่ถ้าฉันปอกเปลือกเผือกทั้งที่ยังไม่สุก บางทีจะคันมือ เลยเอาไปนึ่งให้สุกก่อนแล้วค่อยปอกเปลือก
2. While waiting for the dough to rise, make the filling by preparing the taro.
Wash thoroughly and scrub dirt off the root.
We are going to steam the taro, so you can peel and cut into pieces before steaming, but dealing with uncooked taro skin makes my hands itchy sometimes, so I'm going to make sure it's cooked before peeling.


3. ตั้งน้ำให้เดือด แล้วนึ่งเผือกนานประมาณ 30 นาที จนเผือกนิ่มดี
3. Bring water to a boil and steam taro for about 30 minutes until fork tender.


4. ลองใช้ส้อมจิ้มดูว่าสุกดีแล้วหรือยัง ถ้าสุกแล้วลอกเปลือกออก
4. Insert a fork to check if it's cooked all the way through, then peel.


5. ถ้าชอบแบบเคี้ยวไปแล้วมีเนื้อหน่อยก็บดเผือกพอหยาบ หรือถ้าชอบเนียน ๆ ก็เอาไปปั่นในเครื่องปั่น (อย่าลืมใส่กะทิลงในเครื่องปั่นนิดหน่อยด้วย จะได้ช่วยถนอมมอเตอร์นะ)
5. Mash taro roughly if you love it chunky, or blend in a blender for a smoother texture. (Don't forget to add some coconut cream in your blender to help your motor last longer.)

6. ใส่กะทิลงในหม้อที่เคลือบสารกันติดแล้วนำมาตั้งไฟอ่อน หรือจะใช้กระทะทองเหลืองก็ได้ ใส่น้ำตาลและเกลือตามลงไป เคี่ยวจนน้ำตาลและเกลือละลายดี
6. In a non-stick pot (I went old school with Thai brass wok), add coconut cream, sugar and salt over low heat. Stir until dissolved.


7. ใส่เผือกตามลงไป ใช้ไฟอ่อน กวนประมาณ 40 นาทีจนข้น
7. Add mashed taro into the mixture. Stir over low heat for about 40 minutes until thicken.


พอทำเผือกกวนเสร็จ แป้งที่เตรียมไว้ตอนแรกก็จะได้ที่พอดี
By the time you finish preparing the filling, the dough should be ready.


8. แบ่งแป้งออกเป็น 8 ส่วน คลึงให้เป็นลูกกลม ๆ แล้วตักไส้เผือกใส่
8. Divide your dough into 8 balls and stuff the taro filling.


9. เอาไปทอดในกระทะที่เคลือบสารกันติด ทาน้ำมันเคลือบบาง ๆ ใช้ไฟกลาง
9. Fry in a non-stick pan with lightly coated oil over medium heat.


พอด้านหนึ่งเริ่มเกรียมแล้ว พลิกกลับอีกด้าน
When one side starts to brown, flip onto the other side.


ใช้ตะหลิวกดให้แผ่ออกแบน ๆ ทอดจนสุกดี และเกรียมทั้งสองด้าน
Flatten it out with a spatula. Fry until it's cooked and brown on both sides.


เสร็จแล้ว
Voila!


เก็บในตู้เย็นได้ประมาณ 5 วัน พอจะทานก็นำมาอุ่นซ้ำในเตาอบหรือในกระทะ
I store my Hotteok for up to 5 days in the fridge and reheat in an oven or a frypan.

วันจันทร์ที่ 28 สิงหาคม พ.ศ. 2560

ย้อมผ้าด้วยเปลือกเงาะ -- Dyeing with Rambutan Peels

19:54 0
ย้อมผ้าด้วยเปลือกเงาะ -- Dyeing with Rambutan Peels
ทุกคนในบ้านฉันจะดีใจกันยกใหญ่เวลาถึงหน้าเงาะ
ตอนฉันยังเล็ก บางวันพอกลับมาจากโรงเรียน แม่จะคว้านเงาะใส่ชามแช่ตู้เย็นรอไว้ ยังจำได้เลยว่าเป็นชามแก้วใส ๆ มีลายรูปแอปเปิลนูน ๆ
ถ้าไปโรงเรียนแล้วได้กลับมาเจอแบบนี้ ก็ยอมไปโรงเรียนแบบไม่เกี่ยงงอนเลย

อาทิตย์ที่แล้ว พี่สาวฉันซื้อเงาะมากิโลหนึ่ง เลยบอกให้พี่ช่วยเก็บเปลือกเงาะไว้ก่อน
อยากเอาเปลือกมาใช้ประโยชน์ให้เต็มที่ ก่อนจะคืนเขาสู่ผืนดิน

Everyone in my family is happy when rambutan is in season.
Back when I was little, when I came home from school, my mom would have a bowl of rambutans, peeled, seeds removed, waiting for me in the fridge.
What a delight!
I would want to go to school, just to come back and dig in to rambutans.

Last week, my sister bought a kilo of rambutans and I told her to save the peels for me.
I wanted to make the most of the peels before returning them to the earth.


ฉันตัดแล้วแช่ผ้าดิบทิ้งไว้นานหลายชั่วโมงจนผ้านิ่ม
I soaked my fabrics for many hours until soft.


ใช้กรรไกรตัดเปลือกเงาะเป็นชิ้นเล็กๆ ใส่ลงในหม้อ ใส่น้ำพอท่วม ใส่เกลือลงไป 1 กำมือ เอาไปตั้งไฟให้เดือด พอเดือดแล้วต้มต่อประมาณ 2 ชั่วโมง
I cut the peels into small pieces, then placed them in a pot with enough water to cover the peels. I added a handful of salt, brought them to a boil and simmered for 2 hours.


ระหว่างที่รอต้มสีให้ออก ก็มาพับผ้า มัดเป็นลวดลาย
While I left the peels simmering in the pot, I had a lot of fun with folding the fabrics to make patterns.


ผ่านไป 2 ชั่วโมง ตักเอาเปลือกเงาะอออก แล้วเอาผ้ามาจุ่มลงในน้ำย้อม กดลงไปจนจม แล้วแช่ทิ้งไว้ข้ามคืน
After 2 hours, I discarded the peels and submerged the fabrics in the dye. I left them soaking overnight.


หลังจากแช่ผ้าในน้ำย้อมไปประมาณหนึ่งชั่วโมง ฉันหยิบผ้าผืนหนึ่งมาล้างน้ำให้สะอาด แล้วลองแช่น้ำลอยสารส้ม แช่ทิ้งไว้อย่างนั้นข้ามคืน
After the fabrics had been soaking in the dye for an hour, I took a piece out, rinsed and soaked it in alum water overnight.


ผ้าผืนซ้ายคือผืนที่แช่น้ำลอยสารส้ม สีออกมาอ่อนกว่าผืนอื่น ๆ นิดหน่อย น่ารักดี
The one on the left is soaked in alum water. I came out a little lighter in color.


ขิงดอง -- Pickled Ginger

11:28 0
ขิงดอง -- Pickled Ginger
ขิงดองทั้งสด กรอบ หวาน หอม อร่อย และเพิ่มรสชาติให้อาหารได้หลายเมนู
ไปเดินตลาดหน้านี้ เห็นขิงอ่อนวางขายเยอะ ฤดูอื่นไม่เห็นมี ตลอดทั้งปี จะเห็นขิงอ่อนแต่ฤดูกาลนี้เท่านั้น
ในเมื่อโอกาสมีแค่ปีละครั้ง อย่างนั้นรีบคว้ากลับบ้านมาทำขิงดองดีกว่า

It' s fresh. It's sweet. It adds that crispness and that kick to many dishes.
This season is the only season you can get young ginger.
Since this opportunity comes only once a year, why not seizing it?


วัตถุดิบ
  • ขิงอ่อน 1 กิโลกรัม
  • เกลือ 2 ช้อนโต๊ะ
น้ำดอง
  • น้ำส้มสายชู 3/4 ถ้วย (ใช้แบบกลั่นหรือแบบหมักจากข้าว)
  • น้ำตาล 200 กรัม
  • เกลือ 1 ช้อนชา
  • น้ำเปล่า 1/2 ถ้วย
Ingredients
  • 1 kilogram of young ginger
  • 2 tablespoon of salt
For the Brine
  • 3/4 cup of vinegar (distilled or rice vinegar)
  • 200 grams of sugar
  • 1 teaspoon of salt
  • 1/2 cup of water

วิธีทำ
Instructions

1. ฆ่าเชื้อโหลแก้วให้สะอาด ใส่โหลแก้วลงในหม้อ ใส่น้ำลงพอท่วม ตั้งไฟ พอเดือดให้ปิดไฟ จากนั้นทิ้งโหลไว้ในหม้อ ปิดฝาด้วยนะ ทิ้งไว้อย่างนั้น 20 นาที แล้วคีบขึ้นมาพักบนตะแกรงให้เย็น
1. Sterilize your jars. I put them in a pot, with enough water to cover the jars and turn on the heat. When I water starts to boil, turn off the heat and leave them in the pot with the lid on for 20 minutes. Remove the jars to a rack to cool. 


2. ล้างขิงให้สะอาด ปอกเปลือก แล้วฝานเป็นแว่นบาง ๆ ใช้มีดปอกมะม่วงหรือแมนโดลินสไลซ์ผักก็ได้ค่ะ
2. Wash and peel the ginger, then slice thinly with a peeler or a mandolin.


3. เอาขิงมาซาวเกลือ พักไว้สัก 20 นาที แล้วล้างสักสองสามน้ำ จากนั้นบีบน้ำออกจากขิงให้หมด
3. Salt the ginger for about 20 minutes. Rinse a few times and squeeze excess water out.

4. เตรียมน้ำดองโดยผสมวัตถุดิบทั้งหมดเข้าด้วยกัน ตั้งไฟให้เดือด คนให้น้ำตาลละลาย พักลงให้พออุ่น
4. Prepare the brine by combining all the ingredients in a saucepan and bring to a boil. Make sure the sugar is completely dissolved. Leave to warm.


5. ใส่ขิงลงในโหล แล้วเทน้ำดองตามลงไปให้ท่วมขิง ปิดฝา
5. Add ginger to the jars and pour the warm brine over to cover the ginger. Seal the jars.


รอหนึ่งวัน ขิงดองสีนวลอมสีชมพูสวยก็พร้อมทานแล้วค่า
This ivory beauties with pinkish hue will be ready to add so many depth of flavors in your dishes the next day.

วันศุกร์ที่ 25 สิงหาคม พ.ศ. 2560

น้ำเต้าหู้ -- Soy Milk

06:01 0
น้ำเต้าหู้ -- Soy Milk
ตอนฉันยังเด็ก ภาพของแม่ทำน้ำเต้าหู้หม้อใหญ่เป็นภาพที่เห็นจนชินตา
ฉันชอบกลิ่นหอมจาง ๆ ของถั่วเหลืองที่อบอวลอยู่ในห้องครัวที่สุด
ไม่มีอะไรอร่อยเท่าน้ำเต้าหู้ที่ทำเองอีกแล้ว
ทั้งที่ไม่ได้มีเคล็ดลับอะไรมากมายหรอกค่ะ แค่ทำทานใหม่ ๆ สด ๆ นั่นล่ะ ที่อร่อย
ถึงแม้จะทำออกมาแล้วอร่อยแค่ไหน ทิ้งไว้หลายวันหน่อย ก็หมดอร่อยแล้ว
ฉันว่าที่อร่อยที่สุด น่าจะเป็นกลิ่นหอมของถั่วเหลืองนะ แต่ทิ้งไว้หลายวัน กลิ่นนี้จะค่อย ๆ จางไป

When I was a kid, a scene of my mom making a big pot of soy milk could be seen once every few days.
The subtle scent of  soy beans lingering in the kitchen was my favorite part.
Nothing tastes like homemade soy milk.
There's no secret to it. It's at its best when it's fresh.
Even really good soy milk can turn bland after a few days, losing its aroma, which is the best part.


 นอกจากวิธีทำจะง่ายแล้ว เวลาที่ทำน้ำเต้าหู้ยังเป็นช่วงเวลาแสนสุข ที่ดีต่อทั้งตา หู จมูก ลิ้น กาย ใจอีกด้วย
ฉันหลงรักทั้งรูปทรงและสีสันของถั่วเหลืองที่ดูละมุนตา
เสียงเมล็ดถั่วกระทบกันดังกริก ๆ กลิ่นหอมอ่อนโยน ได้กลิ่นแล้วอบอุ่นใจ หลงรักรสชาติของมัน
รักสัมผัสของเมล็ดถั่วที่ไหลผ่านร่องนิ้ว เวลาบีบคั้นน้ำเต้าหู้ จะมีน้ำเต้าหู้เคลือบที่มือบาง ๆ ทั้งนุ่ม เนียน หอม แล้วถ้าใช้ผ้าขาวบางผืนเดิมคั้นน้ำเต้าหู้ซ้ำ ๆ ผ้าผืนนั้นจะหนานุ่ม เหมือนมีกาวนุ่ม ๆ มาเคลือบไว้ เป็นประสบการณ์ที่เพลิดเพลินจริง ๆ
ถ้าได้ลองทำ ขอให้เพลิดเพลินกับทุกขั้นตอนนะคะ

Apart from its simplicity, I learned that making soy milk is a very joyful experience and pleasing to all the five (or six) senses.
I mean, the sight of the soy beans, their shapes and colors are easy on the eye.
I love everything about them, the sound of beans crinkling, its warm and comforting savor, the sensation of soy beans running through your fingers, the thin film of soy milk on your hands feels so velvety. After you've been using the same cheesecloth to strain the milk for a while, it thickens and gets really soft. Every minute spent on making soy milk is so relaxing.
I hope you love making soy milk like I do.

วัตถุดิบ
  • ถั่วเหลือง 200 กรัม
  • ถั่วลิสง 25 กรัม (ไม่ใส่ก็ได้ค่ะ)
  • น้ำเปล่า 800 มิลลิลิตร
  • น้ำตาลทราย 2 ช้อนโต๊ะ
  • ใบเตย สองสามใบ (ถ้ามี)
Ingredients
  • 200 grams of soy beans
  • 25 grams of peanuts (optional)
  • 800 milliliters of filtered water
  • 2 tablespoons of granulated sugar
  • a few pandan leaves (optional)

วิธีทำ
Instructions

1. ล้างถั่วเหลืองและถั่วลิสงให้สะอาด จากนั้นแช่น้ำไว้ข้ามคืน (นาน 4-8 ชั่วโมง) ถั่วลิสงจะไม่ใส่ก็ได้นะ แต่แม่บอกว่าใส่แล้วจะหอมมัน เข้มข้นขึ้น
1. Rinse the beans and peanuts before soaking them overnight (from 4-8 hours). The peanuts here are totally optional. My mom claims that it makes the milk creamier.

2. กรองเอาแต่ถั่วไว้ พักให้สะเด็ดน้ำ
2. Drain the soy beans and peanuts, discard the water that you soaked them in.


3. ใส่ถั่วเหลือง ถั่วลิสง พร้อมน้ำเปล่าลงไปในเครื่องปั่น ปั่นจนเนียนละเอียด (เพิ่มหรือลดปริมาณน้ำได้ตามชอบนะ)
3. Place soy beans and peanuts in a blender, along with filtered water. Blend until smooth and there is no chunk of bean left. (Depending on how thick you want it, you can add more or less water.)


4. นำส่วนผสมตักใส่ผ้าขาวบาง บีบคั้นเอาแต่น้ำนมลงในชามหรืออ่างผสม ตอนนี้มือจะนุ่มเนียน และหอมมาก :) พอคั้นน้ำออกมาแล้ว จะได้กากถั่วเหลือง เอาไปผัด ใส่กระเทียม คั่วไฟอ่อน ๆ กินได้ค่ะ แต่เราเก็บเอาไว้ต้มให้หมูกับไก่ที่บ้านกิน
4. Strain the blended milk through cheesecloth. Squeeze with all your strength. At this point, your hands should be silky smooth already. :) You'll be left with soy pulp which can be saved for stir-fry. I normally boil the pulp and feed it to my pigs and chicken.


5. นำน้ำนมที่คั้นออกมาแล้ว ใส่ในหม้อ ตั้งไฟกลาง ใส่ใบเตยมัดตามลงไปได้ เพิ่มความหอม หมั่นคนอยู่เรื่อย ๆ เพื่อไม่ให้ติดก้นหม้อนะคะ
5. Place the strained milk in a pot, along with pandan leaves (if you have ones) and place the pot over medium heat. Stir well to keep it from sticking.


6. พอเริ่มเดือด ลดไฟลงเหลือไฟอ่อน เติมน้ำตาล คนให้ละลาย
6. Once it starts to bubble, turn the heat down to low, add sugar or other sweetener of your choice. Stir until dissolved.


7. พอน้ำตาลละลายดี ปิดไฟ แล้วตักเสิร์ฟ
7. When sugar is completely dissolved, turn off the heat and Enjoy!


ขอให้ดื่มแล้วอบอุ่นหัวใจค่ะ
Stay warm and cozy!

วันศุกร์ที่ 18 สิงหาคม พ.ศ. 2560

ข้าวเหนียวเปียกลำไย -- Sticky Rice Pudding with Longan

08:43 0
ข้าวเหนียวเปียกลำไย -- Sticky Rice Pudding with Longan
กลางเดือนสิงหาแบบนี้ มองไปทางไหนก็เห็นมีแต่ลำไยเต็มตลาดไปหมด
จำได้ว่าตอนเด็ก ๆ ฉันชอบซื้อลำไยกระป๋องมา ตักน้ำแข็งใส่แล้วกิน ชื่นใจชะมัด
ถึงแม่จะคอยเตือนว่าอย่ากินเยอะ กินแล้วจะร้อนใน เพราะลำไยมันร้อน
แต่ฉันก็ไม่เชื่อว่าจะมีเด็กคนไหนหักห้ามใจไม่ให้กินลำไยได้หรอก

ที่เชียงดาว ลำไยมีปลูกกันแทบจะทุกบ้าน
ที่บ้านฉันก็มีอยู่สองสามต้น แต่ปีนี้ไม่ติดผล
ถึงอย่างนั้น ก็ยังมีคนรู้จักหอบลำไยมาให้เป็นเข่ง ๆ ไม่ได้มีว่างเว้น
กินลำไยเปล่า ๆ มาจนเบื่อ เลยลองทำขนมง่าย ๆ ดู ใช้วัตถุดิบไม่กี่อย่างเท่านั้น
ก็ได้ข้าวเหนียวเปียกลำไย หวาน ๆ มัน ๆ หอมใบเตย หอมกะทิ หวานข้าวเหนียว ตัดรสด้วยลำไย
นั่งกินอยู่ในบ้านวันฝนตกก็ชื่นใจดี

It's mid-August and Longans are everywhere.
This sweet mellow fruit is everyone's favorite.
Seriously, I've never met anyone who doesn't like Longan.
As a kid, I usually bought the canned ones and top them with lots of ice and enjoyed the icy sweet treat during summer. That was how I survived Bangkok's heat.

Moving to Chiang Mai, I found that almost every house in my neighborhood has Longan trees.
Since they're now in season, Longans are are all over the market.
I've had so many fresh Longans for weeks and I think the time has come for me to find new ways of eating them.
With sticky rice, sugar, Longans, coconut cream, salt and two pots, the result is this simple yet luscious Thai dessert.


วัตถุดิบ (สำหรับ 2 ที่)
  • ข้าวเหนียวเขี้ยวงู 1 ถ้วย
  • น้ำเปล่า 3 ถ้วย
  • ใบเตย สองสามใบ (ถ้ามี)
  • น้ำตาลทราย 3/4 ถ้วย
  • เกลือหนึ่งหยิบมือ
  • ลำไย 3 ขีด หรือมากน้อยตามชอบ
น้ำกะทิราดหน้า
  • หัวกะทิ 1 ถ้วย
  • เกลือ 1 ช้อนชา
Ingredients (2 Servings)
  • 1 cup of Thai sticky rice
  • 3 cups of water
  • a few pandan leaves (optional)
  • 3/4 cup of granulated sugar
  • a pinch of salt
  • 300 grams of Longans (fresh or canned) or as many as you like
For coconut cream topping
  • 1 cup of coconut cream
  • 1 tsp of salt
วิธีทำ
Instructions

1. ซาวข้าวเหนียวสักสองสามน้ำ (เก็บน้ำสุดท้ายไว้ล้างหน้าได้นะ บำรุงผิว)
1. Rinse sticky rice a few times and drain. (You can save last batch of rice water to wash your face. It's good for your skin.)

2. ปอกเปลือกและคว้านเม็ดลำไย ฉันใช้ปลายช้อนแกงแงะเข้าไปควักเม็ดออกมา
2. Peel and deseed Longans. You can peel them with your hands. I use the tip at the end of this Thai spoon to take the seeds out. If you use the canned ones, drain them. We're using only the fruits and not the syrup.


3. ตั้งน้ำในหม้อให้เดือด
3. Bring the water to a boil in a pot.

4. เมื่อน้ำเดือดแล้ว ใส่ข้าวเหนียวลงไป ตามด้วยใบเตยมัด ใช้ไฟแรงปานกลาง คอยคนบ่อย ๆ ไม่ให้ข้าวติดก้นหม้อ
4. Over medium-high heat, add sticky rice to boiling water. Add a few pandan leaves, if you have ones. Stir regularly to prevent it from sticking to the pot.


4. ต้มจนข้าวเริ่มบาน ชิมดูแล้วนิ่ม ไม่มีไตแข็ง ๆ จากนั้นก็เติมน้ำตาล เกลือหนึ่งหยิบมือ ถ้าน้ำงวดลงจนเหนียวเกินไป ก็เติมน้ำเปล่าเพิ่มได้ อย่าต้มนานเกิน ข้าวจะเละ
4. When the rice starts to get fluffy and tender (when you chew into it), add sugar to it, followed with a pinch of salt. Add some more water if it gets too sticky. Stir well. Be careful not to overcook the rice or the whole thing would get pretty slimy.


5. เติมลำไยลงในหม้อ ต้มต่ออีกสองสามนาที
5. Add Longans to the pot and simmer for a few more minutes.

6. ใส่กะทิกับเกลือหนึ่งช้อนชาในหม้ออีกใบ ตั้งไฟอ่อน เคี่ยวจนเดือด
6. In another pot or a saucepan, add coconut cream and a teaspoon of salt over low heat. Bring to a boil.

7. ตักข้าวเหนียวใส่ชามเสิร์ฟ ราดหน้าด้วยน้ำกะทิ
7. To serve, ladle sticky rice and Longan into a bowl and top with coconut cream dressing.

ขอให้มีชีวิตที่หวานชื่นค่ะ
Have a sweet day!